Formidable
•
WRA Administration
Posts: 618
Likes: 570
Gender: Male
|
Post by Formidable on May 14, 2016 9:31:11 GMT -5
You know that you've always wanted to put a sweet livery on your car, but the thing is, where do you start? Well that, my friends, is what I'm going to show you how to do. This'll include the basics of making your livery, and some tips that you'll need in making them. Part 1: Making the DesignFirstly, you'll need a photo editor. I mainly use Photoshop, but GIMP will work just as well. paint.net will work on body templates, but not on window templates because it does not support alpha channels (in other words, your windows will appear completely opaque, with no transparency). Now you'll need templates. Templates are useful for determining what goes where on the car. Here are links to download templates for the current mods being used: Australian GT (GTE-Am) Enduracers (genstring values are in the READ ME) (GTE-Am, GTE-Pro, Prototype) WES and ES Addon (GTE-Pro, Prototype) Now that you've downloaded the templates, open the file. They may be in a .zip or .rar file. Windows already has a built-in .zip program, but you'll need to download WinRAR in order to open .rar files. If you don't have a .zip feature, then 7zip will do the job. As you'll see, whatever car file you chose will have a few files. The regular file, which is the body; the WINDOW file, being the windows of the car; and maybe an EXTRA file where other bits of the car are. Usually EXTRA files have parts on the car that can be interchangeable via the Genstring, but I'll cover that later. When you open your regular file, you should have something that looks like this:  The next thing to do would be to go to a "paint here" layer. That's where you always want to be if you're designing a livery. You can still create new layers above that one, but never any higher or else the result will come out very weird. I'll show in example: Good! No good! Bail out! No good! Bail out! Once you've made sure about that, you can now start painting away! Remember, whatever you do on the body will translate into the game. Keep in mind also to visualize what it would look like on the car. The car won't be flat and boxy like the livery is!  Once you're done, make sure to save your file, but also save another copy of it as a .dds. nVidia's .dds plugin is able to save .psd files as a .dds. When saving window files, make sure to save them as DXT5, not DXT1. You'll find this option at the top where there should be a drop-down menu. |
|
Formidable
•
WRA Administration
Posts: 618
Likes: 570
Gender: Male
|
Post by Formidable on May 14, 2016 10:04:39 GMT -5
Part 2: Testing... Testing! 123!Now that you've finished you livery, you decide you want to preview it. You could ask me or Ricardo Lionheart to do a preview, but you're like "nah I'm a big boy! I can do it myself!" Well you're going to have to learn the ropes first, so here's how to preview your new livery. rFactor is a good way to preview. You can always use 3-D rendering software, but I don't have that :/ If you have rFactor on steam, go to the following: C:/Program Files(x86)/Steam/steamapps/common/rFactor/GameData/Vehicles If you don't have 64-bit Windows, just go through regular Program Files, not (x86). Next, go to the file in which mod your template is for. There should be another file with the mod name, so click on that. Click on the "Team" file if there's that too. Then take any of the team files, and copy-paste. Delete any .dds files in that file. Now you're going to access the .veh file. This can be opened via Notepad. When opened, you'll see this:
// EnduRacers - Endurance Series

// EnduRacers © 2010

// SP1


// The first section defines what maps to load for the new vehicle skinning

// technology.  The first line defines a "prefix" to be used for all generic maps.

// Currently, generic maps are used for the livery, wing, driver, driver arms,

// driver helmet, and pit crew.  The second line will replace the default livery

// with the new specified, for the track specified.  The format is as follows:

//

// DefaultLivery="PREFIX"       // PREFIX is the base texture map name, assumed to be BMP unless specified

// PitCrewLivery="PREFIX"       // This is only needed if it differs from the default livery PREFIX

// TrackLivery="TRACK, PREFIX"  // TRACK is the track name as defined in the event GDB

// TrackLivery="TRACK, PREFIX"  // For example, "2004_Toban"

// TrackLivery="TRACK, PREFIX"  // You can have an infinite # of these lines

//


DefaultLivery="Saleen_091051.dds"

Extra1="WINDSCREEN"

Extra4="EXTRA"

Extra5="BBSRIMS"

Extra6="OZRIMS"

Extra7="SALEENRIMS"


HDVehicle=ALMS06_S7R.hdv

Graphics=ALMS06_S7R.gen

Spinner=ALMS06_S7R_Spinner.gen

GenString=11131321                          //1:Chassis=BASIC/ORECA, 2:AirIntake=BASIC/LARBRE/ORECA, 3:Mirrors=BASIC/SMALL/LARBRE, 4:RIMS=BBS/OZ/S7R, 5:TYRE=Michelin/Pirelli/Dunlop, 6:RWing=CURVED/FLAT/FLAT2/ORECA/OlgBigFlat, 7:REAR_BLADE=YES/NO, 8:RearGrill=BASIC/ORECA/PAINTED

Sounds=ALMS06_S7R.sfx                  // Sounds=default.sfx

Cameras=ALMS06_S7R.cam            // Defaults to default.cfg in UserData directory

HeadPhysics=ES_GT_Headphysics.ini         // Affects driver eyepoint only

Cockpit=ALMS06_S7R_cockpitinfo.ini

Upgrades=ALMS06_S7R_Upgrades.ini

//AIUpgradeClass=


//////////////////////////TEAM HISTORY AND INFORMATION///////////////////////////////////////////


Number=51

Team="LMS09 ARC Bratislava"

PitGroup="Group10"

Driver="Miro Konopka"

Description="#51 - ARC Bratislava"

Engine="Saleen 7.0L"

Manufacturer=""

Classes="EnduSeries ES_LMS09 ES_GT1 ES_GT1SaleenS7"


FullTeamName="LMS09 ARC Bratislava"

TeamFounded=""

TeamHeadquarters=""

TeamStarts=n/a

TeamPoles=n/a

TeamWins=n/a

TeamWorldChampionships=n/a


Category="Endurance Series,GT1,Saleen S7R"
Where it says "Default Livery", you'll notice text saying: Saleen_091051. That text is what your .dds file names should be when you paste your liveries into the file. You can change this line to any name you want; just as long as the same name is applied to all the other files in the file. You'll also notice this:
Extra1="WINDSCREEN"

Extra4="EXTRA"

Extra5="BBSRIMS"

Extra6="OZRIMS"

Extra7="SALEENRIMS"
As long as your window and extra .dds files have a prefix or suffix similar to those, they should be applied to the car. Now look at the bottom part. Change the "FullTeamName" line to whatever your team name is. This is just so rFactor doesn't get confused. Here's a before and after of a changed .veh file. Before...
// EnduRacers - Endurance Series

// EnduRacers © 2010

// SP1


// The first section defines what maps to load for the new vehicle skinning

// technology. The first line defines a "prefix" to be used for all generic maps.

// Currently, generic maps are used for the livery, wing, driver, driver arms,

// driver helmet, and pit crew. The second line will replace the default livery

// with the new specified, for the track specified. The format is as follows:

//

// DefaultLivery="PREFIX" // PREFIX is the base texture map name, assumed to be BMP unless specified

// PitCrewLivery="PREFIX" // This is only needed if it differs from the default livery PREFIX

// TrackLivery="TRACK, PREFIX" // TRACK is the track name as defined in the event GDB

// TrackLivery="TRACK, PREFIX" // For example, "2004_Toban"

// TrackLivery="TRACK, PREFIX" // You can have an infinite # of these lines

//


DefaultLivery="Saleen_091051.dds"

Extra1="WINDSCREEN"

Extra4="EXTRA"

Extra5="BBSRIMS"

Extra6="OZRIMS"

Extra7="SALEENRIMS"


HDVehicle=ALMS06_S7R.hdv

Graphics=ALMS06_S7R.gen

Spinner=ALMS06_S7R_Spinner.gen

GenString=11131321 //1:Chassis=BASIC/ORECA, 2:AirIntake=BASIC/LARBRE/ORECA, 3:Mirrors=BASIC/SMALL/LARBRE, 4:RIMS=BBS/OZ/S7R, 5:TYRE=Michelin/Pirelli/Dunlop, 6:RWing=CURVED/FLAT/FLAT2/ORECA/OlgBigFlat, 7:REAR_BLADE=YES/NO, 8:RearGrill=BASIC/ORECA/PAINTED

Sounds=ALMS06_S7R.sfx // Sounds=default.sfx

Cameras=ALMS06_S7R.cam // Defaults to default.cfg in UserData directory

HeadPhysics=ES_GT_Headphysics.ini // Affects driver eyepoint only

Cockpit=ALMS06_S7R_cockpitinfo.ini

Upgrades=ALMS06_S7R_Upgrades.ini

//AIUpgradeClass=


//////////////////////////TEAM HISTORY AND INFORMATION///////////////////////////////////////////


Number=51

Team="LMS09 ARC Bratislava"

PitGroup="Group10"

Driver="Miro Konopka"

Description="#51 - ARC Bratislava"

Engine="Saleen 7.0L"

Manufacturer=""

Classes="EnduSeries ES_LMS09 ES_GT1 ES_GT1SaleenS7"


FullTeamName="LMS09 ARC Bratislava"

TeamFounded=""

TeamHeadquarters=""

TeamStarts=n/a

TeamPoles=n/a

TeamWins=n/a

TeamWorldChampionships=n/a


Category="Endurance Series,GT1,Saleen S7R"
After!
// EnduRacers - Endurance Series

// EnduRacers © 2011

// SP2


// The first section defines what maps to load for the new vehicle skinning

// technology.  The first line defines a "prefix" to be used for all generic maps.

// Currently, generic maps are used for the livery, wing, driver, driver arms,

// driver helmet, and pit crew.  The second line will replace the default livery

// with the new specified, for the track specified.  The format is as follows:

//

// DefaultLivery="PREFIX"       // PREFIX is the base texture map name, assumed to be BMP unless specified

// PitCrewLivery="PREFIX"       // This is only needed if it differs from the default livery PREFIX

// TrackLivery="TRACK, PREFIX"  // TRACK is the track name as defined in the event GDB

// TrackLivery="TRACK, PREFIX"  // For example, "2004_Toban"

// TrackLivery="TRACK, PREFIX"  // You can have an infinite # of these lines

//


DefaultLivery="Saleen_112800.dds"

Extra1="WINDSCREEN"

Extra4="EXTRA"

Extra5="BBSRIMS"

Extra6="OZRIMS"

Extra7="SALEENRIMS"


HDVehicle=ALMS06_S7R.hdv

Graphics=ALMS06_S7R.gen

Spinner=ALMS06_S7R_Spinner.gen

GenString=13321411                          //1:Chassis=BASIC/ORECA, 2:AirIntake=BASIC/LARBRE/ORECA, 3:Mirrors=BASIC/SMALL/LARBRE, 4:RIMS=BBS/OZ/S7R, 5:TYRE=Michelin/Pirelli/Dunlop, 6:RWing=CURVED/FLAT/FLAT2/ORECA/OlgBigFlat, 7:REAR_BLADE=YES/NO, 8:RearGrill=BASIC/ORECA/PAINTED

Sounds=ALMS06_S7R.sfx                  // Sounds=default.sfx

Cameras=ALMS06_S7R.cam            // Defaults to default.cfg in UserData directory

HeadPhysics=ES_GT_Headphysics.ini         // Affects driver eyepoint only

Cockpit=ALMS06_S7R_cockpitinfo.ini

Upgrades=ALMS06_S7R_Upgrades.ini

//AIUpgradeClass=


//////////////////////////TEAM HISTORY AND INFORMATION///////////////////////////////////////////


Number=011

Team="GRL16 Raiden Motorsports"

PitGroup="Group05"

Driver="Hannah Taylor"

Description="#11 - Raiden Motorsports"

Engine="Saleen 7.0L"

Manufacturer="Michelin"

Classes="EnduSeries ES_LM01 ES_GT1 ES_GT1SaleenS7"


FullTeamName="Raiden Motorsports"

TeamFounded="2015"

TeamHeadquarters=""

TeamStarts=n/a

TeamPoles=n/a

TeamWins=n/a

TeamWorldChampionships=n/a


Category="Endurance Series,GT1,Saleen S7R"
Here's an example of what the completed team file should look like: Before... 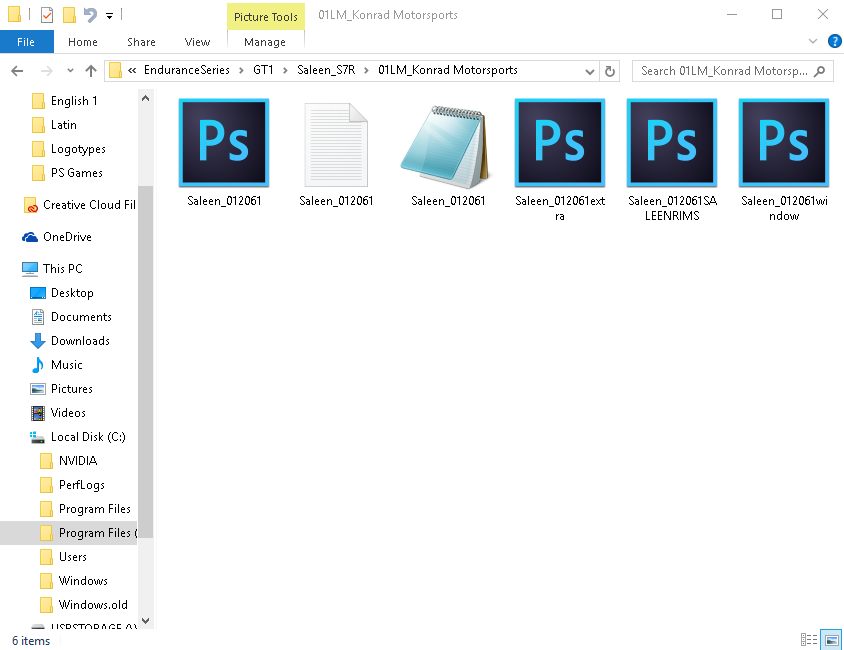 After! 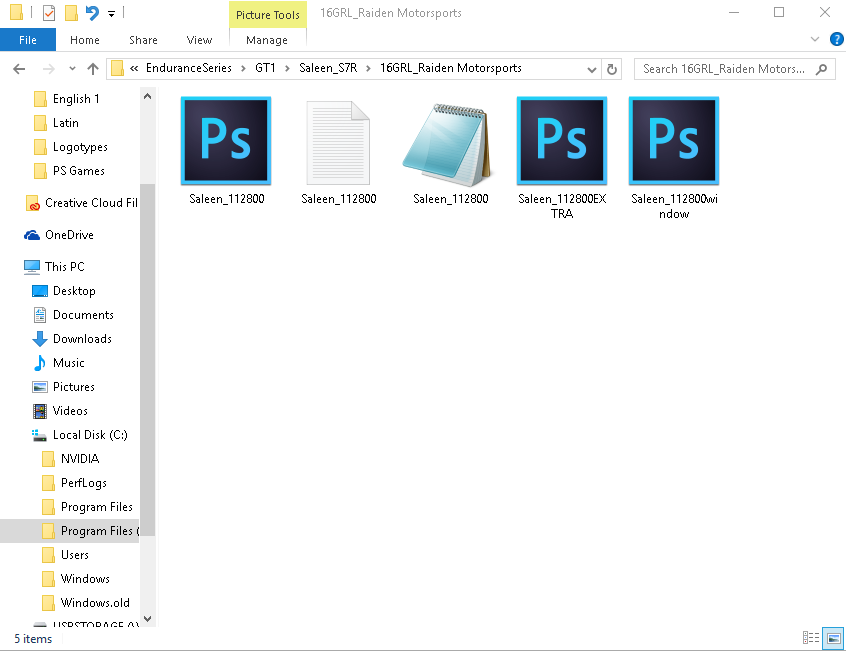 Also if you're wondering what "Genstring" is, it's basically telling what certain 3-D parts to put on cars. Each number registers a different part. One could be the mirrors, the other being the rear wing, etc. You can find more about what value does what in the instructions beside the value itself. (This goes for Enduracers. The instructions for what the genstring values do can also be found in a README section, or right beside the value itself.)
|
|
Formidable
•
WRA Administration
Posts: 618
Likes: 570
Gender: Male
|
Post by Formidable on May 14, 2016 10:06:48 GMT -5
Part 3: Questions?If you have any questions, feel free to reply below! I'll make sure to answer them to the best of my ablility! Others in the community are also willing to help.  If you are still confused about previewing your livery, I'll be glad to preview it for you! I'll make sure to take as many necessary screenshots as possible!
|
|
FMecha
•
Member
Posts: 54
Likes: 28
Gender: Male
|
Post by FMecha on May 14, 2016 11:47:41 GMT -5
I know that I am a complete scrub when painting anything that isn't GP2 (the old MS-DOS F1 game used for GP Rejects' AutoReject World Series), but since Formidable mentioned about DDS and GIMP, here's the DDS tool needed for GIMP users (like me): code.google.com/archive/p/gimp-dds/downloads |
|
|
|
Post by B.K.Glover on May 14, 2016 12:27:45 GMT -5
I know that I am a complete scrub when painting anything that isn't GP2 (the old MS-DOS F1 game used for GP Rejects' AutoReject World Series), but since Formidable mentioned about DDS and GIMP, here's the DDS tool needed for GIMP users (like me): code.google.com/archive/p/gimp-dds/downloadsSo what do I need to download for this to work right? Source and x64 file or just the x64? |
|
|
|
Post by Ricardo Lionheart on May 14, 2016 12:29:35 GMT -5
B.K.GloverJust the x64 file, source is mainly for coder bros who can understand zeros and ones for their own amusement.
|
|
|
|
Post by B.K.Glover on May 14, 2016 12:33:20 GMT -5
B.K.Glover Just the x64 file, source is mainly for coder bros who can understand zeros and ones for their own amusement. OK. I assume that using the 3.0.1 version would be best? |
|


